Washington State University

IV.A

1. Definitions

Standard Operating Procedures (SOPs) are written safety and health guidelines required for work with hazardous chemicals. “Hazardous chemicals” are defined as having statistically significant evidence based on at least one study conducted in accordance with established scientific principles that acute or chronic health effects may occur in exposed employees.

Included in the definition of hazardous chemical is a select group of chemicals that will require additional handling provisions. This group is referred to in the Laboratory Safety Standard as “particularly hazardous substances” and includes chemicals that meet any of the following criteria:

  • A. High degree of acute toxicity:
    The Environmental Protection Agency (EPA) has adopted the following criteria to identify acutely toxic chemicals based on data from mammalian testing.

    • Dermal route: the median lethal dose (LD50) is less than or equal to 50 mg/kg.
    • Oral route: the median lethal dose (LD50) is less than or equal to 25 mg/kg.
    • Inhalation route: the median lethal concentration (LC50) is less than or equal to 0.5 mg/l where time of exposure is any time up to 8 hours.(LD50) is a single dose of a material expected to kill 50% of a group of test animals. (LC50) is a calculated concentration of a material in air, exposure to which for a specified length of time is expected to cause death of 50% of a defined experimental animal population.
  • B. Select carcinogens:
    • Listed as “known to be carcinogens” in the Annual Report on Carcinogens published by the National Toxicology Program (NTP) (latest edition), or
    • Listed under Group 1 (“carcinogenic to humans”) by the International Agency for Research on Cancer (IARC) Monographs (latest editions), or
    • Listed in either Groups 2A or 2B by IARC or under the category, “reasonably anticipated to be carcinogens” by the NTP, and causes statistically significant tumor incidence in experimental animals in accordance with any of the following criteria:
      • after inhalation exposure of 6-7 hours per day, 5 days per week, for a significant portion of a lifetime to dosages of less than 10 mg/m3; or
      • after repeated skin application of less than 300 mg/kg of body weight per week; or
      • after oral dosages of less than 50 mg/kg of body weight per day.
    • Listed as a DOSH regulated carcinogen in WAC 296-62-073(see Appendix K).
    • Substances listed as confirmed (A1) or suspected (A2) human carcinogens in the most current version of ACGIH Threshold Limit Values.

    See the Addendum to Appendix K, the “List of Known Carcinogens and Non-Carcinogens,” for further information.

  • C. Reproductive Toxins (See Appendix L)
    Reproductive Toxins are chemicals that affect the reproductive capabilities of males or females including chromosomal damage (mutations) and fetal effects (teratogenesis). Safety Data Sheets generally employ the following keywords to designate a reproductive toxin: congenital malformation, fetal toxicity, fetal death, fatal effects to the newborn, neoplastic, teratogenic, mutagenic, maternal effects, paternal effects, fertility and infertility. Use Appendix L or Safety Data Sheets (SDSs) to help in determining whether a chemical may be a reproductive toxin. Appendix L was generated from the Hazardous Substances Databank (HSDB), a database of the National Library of Medicine’s TOXNET System and from the Catalog of Teratogenic Agents by T.H. Shepard.
  • D. To aid in determining whether a chemical is hazardous or particularly hazardous, use the links available through Appendix K, Appendix L, and SDSs. If assistance is needed or questions arise, contact EH&S at 335-3041

2. Guidelines

Standard Operating Procedures (SOPs) are required to be written for chemicals currently in use in the laboratory. When new chemicals are introduced for use they must be included in existing SOPs or in a new SOP. EHS has several hundred SOP templates for various hazardous chemicals for you to use in developing your SOP.

In Appendix M there are examples of Standard Operating Procedure formats and the required Hazard Assessment certification and training documents for PPE. If you already have SOPs for pieces of equipment, chemical processes, mixture preparation, etc., attach those to this portion of the Chemical Hygiene Plan (CHP).

V.P

Laser Safety Information

1. INTRODUCTION

Washington State University’s (WSU) Laser Safety Program is a tool designed to provide assistance for WSU laboratories using laser devices in order to protect Faculty, Staff, employees and students from the hazards associated with their presence and use.

The laser safety policy SPPM 4.50 is based on standards promulgated by Washington Administrative Code (WAC) 296-62-09005, ANSI Z136.1, and applies to all lasers and laser systems, whether purchased, borrowed, fabricated, or brought in for use by others. Refer to SPPM 4.50 for formal guidelines. This section of the Laboratory Safety Manual is meant to provide basic information on laser operation and safety practices only.

Many lasers are capable of causing eye injury to anyone who looks directly into the beam. Reflections alone from high-power laser beams can produce permanent eye damage. High-power laser beams can also burn exposed skin. Laser operators must be aware of other potential dangers such as fire, electrical, biological and chemical hazards.

The Laser Safety Program Template, Appendix Q, was created to assist with the development of an individualized Laser Safety Program specific to an area using lasers. It is not an instruction manual for the use of lasers. The PI / supervisor (Laser Safety Officer) responsible for the laser must provide laboratory specific details in order to complete the Program/Template. While it is obvious that the safe use of all classes of lasers is encouraged, Class 3 and 4 lasers must have a Laser Safety Program in place. The Laser Safety Program Template is available to assist the PI/Supervisor with the development of their individual Laser Safety Program for Class 3 and 4 lasers. If further assistance or information is needed, contact Environmental Health and Safety at 509-335-3041.

Responsible Parties

  • Principal InvestigatorThe Principal Investigator or Laboratory Supervisor is responsible for:
    • Providing laser specific training for all operators.
    • Ensuring each assigned laser is operated safely and in accordance with applicable requirements.
    • Ensuring that each laser is stored securely and safely when not in use so that it is not usable by unauthorized personnel or under unauthorized conditions.
    • Maintaining written SOPs for Class 3B (if required) and all Class 4 lasers and ensuring laser use is commensurate with the requirements of the SOP.
    • Reporting any known or suspected accidents.
    • Ensuring that a hazard assessment for personal protective equipment (PPE) use and specific PPE training is provided for all laser users for whom PPE will be required.


  • Laser Safety OfficerThe Laser Safety Officer will be responsible for:
    • Maintaining inventory of all Class 3B and Class 4 lasers and verifying classification if necessary.
    • Reviewing standard operating procedures, alignment procedures and other control measures, before initial use.
    • Periodically inspect Class 3B and Class 4 lasers to assess compliance with safety requirements.
    • Providing assistance in evaluating and controlling hazards.
    • Maintaining records of Class 3B and Class 4 laser inspections.
    • Participating in accident investigations involving lasers. Suspending, restricting or terminating the operation of a laser or laser system without adequate hazard controls.
    • Maintaining a safe environment/area during the operation of a laser.
    • Ensuring training requirements are completed and documentation is maintained as required.
    • The Laser Safety Officer and Laser Operator are often the same person and may be the Laboratory PI or Manager.
  • Laser OperatorThe laser operator is responsible for:
    • Completing all applicable requirements before operating a laser.
    • Operating lasers safely and in a manner consistent with safe laser practices, requirements and standard operating procedures.
  • Environmental Health and Safety (EH&S)Environmental Health and Safety is responsible for:
    • Updating information regarding the use of lasers as it becomes available
    • Assisting laser containing laboratories with determining the maximum permissible exposure limit (MPE), nominal hazard zone (NHZ), personal protective equipment (i.e., eye protection – optical density, skin protection, etc.); and non-beam hazards as requested;
    • Assisting laser containing laboratories with the implementation of the Laser Safety Program in any given area as requested (i.e. assisting with: the creation of the laser safety plan, determining correct signage, reviewing safety measures, reviewing labeling and reviewing engineering controls in place).

2. LASER CHARACTERISTICS

The term LASER is an acronym for Light Amplification by the Stimulated Emission of Radiation.

Lasers operate by the excitation of a medium through the introduction of energy. As electrons in this medium return to their ground state, they stimulate the release of light of a certain wavelength. This chain reaction continues until a certain number of photons reach the totally reflective mirror. This reverses the direction of the beam and the beam continues to intensify until it passes through the partially transmissive mirror, constituting the laser beam.

Laser radiation will continue to be produced as long as energy is applied to the lasing medium.  Laser radiation differs from normal light in that it is coherent, electromagnetic radiation characterized by one or more specific wavelength(s). The wavelengths are determined primarily by the composition of the lasing medium, which can be a solid, liquid, or gas. Laser radiation may be emitted in the visible portion of the electromagnetic spectrum (wavelengths of 400 – 700 nm) or in the invisible infrared (700-3×10⁶ nm) and ultraviolet (180-400 nm) regions. Laser radiation transmits energy which, when a laser beam strikes matter, can be transmitted, absorbed, or reflected.  If a material transmits a laser beam it is said to be transparent.  If the beam is not transmitted, the material is said to be opaque and the incident radiation is absorbed or reflected.

A.   Absorption

Absorbed laser energy appears in the target material as heat.  Absorption and transmission are functions of the chemical and physical characteristics of the target material and the wavelength of the incident radiation.  At visible wavelengths, laser radiation impinging on the eye is focused on the retina and, if sufficient energy is absorbed, can cause cell destruction.  At longer and shorter wavelengths, such as the far infrared and the ultraviolet, radiation striking the eye is absorbed in the cornea and the lens rather than being focused on the retina.  Although these structures are less easily damaged than the retina, excessive energy absorption can cause cell damage and impairment of vision.

B.   Reflection

Reflection is a function of the physical character of the surface of the target material.  A smooth polished surface is generally a good, or specular, reflector; a rough uneven surface usually is a poor reflector producing a diffuse reflection.  A reflector such as a flat mirror changes the direction of an incident beam with little or no absorption.  A curved mirror or surface will change the divergence angle of the impinging laser beam as well as its direction.

For a diffuse reflection, the reflected energy is scattered in all directions thereby reducing the energy or power density.  Generally, diffusely reflecting surfaces are favored when designing a laser experiment since their use reduces the likelihood of a specular reflection and hence enhances the safety of the experiment. Simple examples of forms of protection include, painting surfaces Matte black to decrease reflection, covering metal beams with non reflective materials or welding blankets, removing rings and other jewelry prior to working with lasers.

C.   Transmission

Most visible light laser beams, such as those generated by HeNe, Nd:Yag, and Krypton lasers are transmitted through clear objects, such as a room window or water.  Use of these types of lasers often requires the use of window coverings that absorbs the beam and prevents the laser hazard from existing outside of the immediate work area.  It is important to note that these coverings will need to be fire resistant for use with higher- powered lasers.  Some lasers, such as CO2, are not transmitted through glass, and therefore do not require the use of window coverings.

3. LASER CLASSIFICATION

To provide a basis for laser safety requirements, all lasers and laser systems in the United States are classified according to the ANSI Z136.1 standard and the Federal Laser Products Performance Standard (FLPPS). The manufacturer is responsible for determining the laser classification. The builder must classify custom-built and modified lasers.  The ANSI Z136.1 standard is enforced by the Occupational Safety and Health Administration (OSHA). The Laser Products Performance Standard is enforced by the Centers for Devices and Radiological Health (CDRH), a part of the Food and Drug Administration (FDA). The following section describes the classification for continuous-wave lasers. The same hazard levels also apply to pulsed lasers with pulse duration of less than 0.25 seconds but classification is more complex.

A.   Class 1, 1M Lasers

Class 1 lasers are low-powered (less than 1mW) and do not emit hazardous radiation under normal operating conditions because they are completely enclosed.  Class 1 lasers are exempt from any control measures. Equipment, such as laser printers and laser disc players, are examples of this class.  These lasers may present hazards if the housing is breached for maintenance (See Embedded Lasers).

D.   Class 3B Lasers

Class 3B lasers are systems with power levels of 5 mW to 500 mW for continuous wave lasers or less than 10 J/cm2 for a 0.25 s pulsed laser.  These lasers produce an eye hazard if viewed directly. This includes intrabeam viewing or specular reflections.  Higher power lasers in this class will also produce hazardous diffuse reflections. See the specific usage requirements for Class 3B lasers.

B.   Class 2, 2M Lasers

Class 2 lasers are visible continuous wave (CW) and repetitive-pulse lasers or laser systems which can emit accessible radiant energy exceeding the appropriate Class 1 AEL but less than 1 mW. The human aversion response or blink reflex, which occurs within 0.25 seconds, provides adequate protection for Class 2 lasers. However, it is possible to overcome the aversion response and stare into the Class 2 laser long enough to damage the eye.  Class 2 lasers are typically exempt from control measures other than having a protective housing and label.  Equipment such as some visible continuous wave Helium-Neon lasers and some laser pointers are examples of Class 2 lasers.

E.   Class 4 Lasers

Class 4 lasers are systems with power levels greater than 500 mW for continuous wave lasers or greater than 10 J/cm2 for a 0.25 s pulsed laser.  These lasers may produce eye, skin and fire hazards through intrabeam viewing, specular or diffuse reflections and the direct beam itself. See the specific usage requirements for Class 4 lasers for further information.

C.   Class 3R Lasers

Class 3R lasers are systems with power levels of 1 to 5 mW that normally would not produce a hazard if viewed for only momentary periods with the unaided eye.  They can pose severe eye hazards when viewed through optical instruments (e.g., microscopes, binoculars, or other collecting optics). Class 3R lasers must be labeled. Equipment, such as some visible continuous wave Helium-Neon lasers and some solid state laser pointers, are examples of Class 3R lasers. It is recommended that no pointers over Class 3R be used.

F.   Embedded Laser

Embedded lasers are found in laser products with lower class ratings. Laser printers, CD players, and laser welders may have Class 3B or Class 4 lasers in their protective and interlocked housings. When such a laser system is used as intended, the lower laser class applies. When such a system is opened (e.g., for service or alignment) and the embedded laser beam is accessible, the requirements for the higher class of the embedded laser must be implemented.


Type
 

Description
 

Examples
 

Beam Hazard
Class 1 Completely enclosed or very low power (0.4 W for visible lasers)CD player, laser printerIncapable of causing injury during normal operation.
Class 1M Completely enclosed or very low power (0.4 W for visible lasers)Laser scanners, etchersIncapable of causing injury unless collecting optics are used
Class 2Visible lasers emitting less than 1mW radiant powerSome laser pointersVisible lasers incapable of causing injury in .25 seconds.
Class 2MVisible lasers emitting less than 1mW radiant powerLaser levels, survey equipmentVisible lasers incapable of causing injury in .25 seconds unless collecting optics are used.
Class 3R1 to 5 mWMost alignment lasers and laser pointersMarginally unsafe for intrabeam viewing; up to 5 times the class 2 limit for visible lasers or 5 times the class 1 limit for invisible lasers.
Class 3B Output power between 5 and 500 mW.Analytical and research applications, embedded lasersEye hazard for intra beam viewing
Class 4Above 500 mWSurgical lasers, cutting, welding, research lasersEye and skin hazard for both direct and scattered exposure.

4. LASER SAFETY HAZARDS

A.    Beam Hazards

The nature of laser beam damage and the threshold levels at which each type of injury may occur depends on several parameters.  These include wavelength of light, energy of the beam, divergence and exposure duration.  For pulsed lasers, parameters also include the pulse length, pulse repetition frequency and pulse train characteristics. ANSI Z136.1 standard establishes Maximum Permissible Exposure (MPE) limits for laser radiation.  MPE’s need to be determined for each specific laser so that a Nominal Hazard Zone (NHZ) can be established.  The Nominal Hazard Zone is the area around a laser in which the applicable MPE is exceeded.  EH&S is available to assist with determining MPEs and NHZs. When an MPE is exceeded, damage can occur to the skin, retina, lens, cornea, and conjunctival tissue surrounding the eye (See Fig. 1). For lasers over 500 mW, the beam has the potential to ignite flammable materials and start a fire.
Thermal burns, acoustic damage, and photochemical damage to the retina may occur from laser light in the near ultraviolet (UV), visible and near infrared (IR) regions (below 400 nm – 1400 nm). Damage occurs as the laser light enters the eye and is focused on the retina. Normal focusing of the eye amplifies the irradiance by approximately 100,000; thus, a beam of 1 mW/cm2 results in an exposure of 100 W/cm2 to the retina. Energy from the laser beam is absorbed by tissue in the form of heat, which can cause localized intense heating of sensitive tissues. The most likely effect of excess exposure to the retina is thermal burn that destroys retinal tissue. Since retinal tissue does not regenerate, the damage is permanent, which may result in the loss of sight in the damaged area.


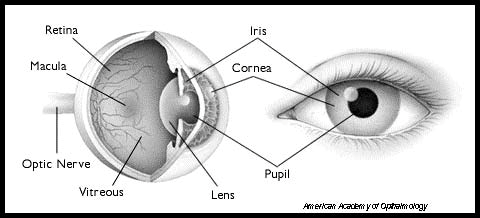
Fig. 1 Anatomy of the Human Eye

Intrabeam viewing of the direct beam and the specularly reflected beam are most hazardous when the secondary reflector is a flat and polished surface (mirror-like). Secondary reflections from rough uneven surfaces produce more diffuse or scattered reflections and are usually less hazardous. Extended source viewing of normally diffuse reflections are not normally hazardous except for very high power lasers (Class 4 lasers). Extra care should be taken with IR lasers since diffuse reflectors in the visible spectrum may reflect IR radiation differently and produce greater exposures than anticipated.

The figures below represent the ways in which laser light can be viewed


Fig.1. Intrabeam viewing of direct (primary) beam. This type of viewing is most hazardous


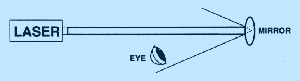
Fig.3. Intrabeam viewing of a specularly reflected (secondary) beam from a curved surface reflector, less hazardous than that of a flat source reflection.


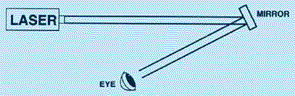
Fig. 2. Intrabeam viewing of a specularly reflected (secondary) beam from a flat surface reflector. Specular reflections are most hazardous when the reflecting surface is flat.


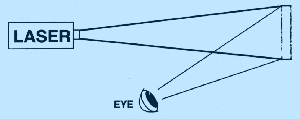
Fig.4. Extended source viewing of a normally diffuse reflection. Diffuse reflections are not normally hazardous, except with very high power Class 4 lasers.

B.   Work Area Safety Practices

  • A laser should be isolated from public areas. Doors should be closed or locked to keep out unauthorized personnel. The proper warning signs should be posted.
  • The illumination in the area should be as bright as practicable in order to constrict the eye pupils of users.
  • The laser should be set up so that the beam path is above or below normal eye level (below 4.5 ft. or above 6.5 ft.).
  • Where practical, the laser system or beam should be enclosed to prevent accidental exposure to the beam.
  • The potential for specular reflections should be minimized by shields and by removal of all unnecessary shiny surfaces.
  • Windows to hallways or other outside areas must be provided with adequate shades or covers when necessary to keep the Nominal Hazard Zone (NHZ) within the room.
  • The main beams and reflected beams should be terminated or dumped. This is required for any accessible laser for which the MPE limit could be exceeded.
  • Electrical installation must meet electrical safety standards. The active laser never should be left unattended unless it is a part of the controlled environment.
  • Warning devices must be installed for lasers with invisible beams to warn of operation.
  • The laser work area should be maintained as free of clutter as possible, to minimize the chance of accidentally igniting something.
  • Ensuring that lasers are well secured to the work surface helps prevent a stray beam.

C.   Safe Laser Use Practices

  • Avoid looking directly at the beam at all times.
  • Do not aim the laser with the eye; direct reflections could cause retinal damage.
  • Avoid looking at the pump source.
  • Clear all personnel from the anticipated path of the beam.
  • Before operating the laser, warn all personnel and visitors of the potential hazard, and ensure all safety measures are satisfied.
  • Be very cautious around lasers that operate at frequencies not visible to the human eye.
  • Do not wear bright, reflective jewelry or other objects, they may become a reflective source.
  • Use appropriately rated optical density eye protection when working with a Class 3B or Class 4 laser.  Eye protection is specific for the type of laser and may not protect at different frequencies or powers. Frequent inspection of protective eyewear to ensure that glasses are not pitted or scratched is needed to ensure they will provide adequate protection. Remember that eye protection does not shield from the beam unless they are worn.

5. LASER USAGE REQUIREMENTS

A.    General Requirements

Class 1 and 2 lasers may be used for the intended purposes of their manufacturer without restrictions.  Any direct eye exposure to these types of lasers should be avoided.

Class 3R, Class 3B, and Class 4 shall carry a warning label containing the laser classification, type, and other warnings required by ANSI Z136.1 or assign an equivalent level by the builder. These requirements also apply to non-commercially built lasers that are used at Washington State University campuses.

All laser operators must complete training specific to the type of laser they operate.

All lasers must be operated according to the applicable ANSI Z136.1 safety standards and in a manner consistent with safe laser practices.  Laser Safety Standard Operating Procedures (SOPs) are required for Class 3B lasers and for all Class 4 lasers.

Each Class 3B and Class 4 laser shall be used in a controlled area that restricts access to unauthorized personnel. The controlled laser areas must be posted with appropriate warning signs.

Each operator of a Class 3B or Class 4 laser must wear protective equipment (e.g., eye wear and clothing) as appropriate.

B.    Engineering Controls

All lasers require a protective housing.

All Class 3B and Class 4 lasers must be equipped with engineered safety features such as:

  • Protective housing interlock system that prevent emission of laser radiation when the housing is open.
  • Viewing portals in the protective housing must be equipped with filters and attenuators that keep escaping light below the Maximum Permissible Exposure (MPE) limit.
  • Optical instruments for viewing the laser system must be equipped with filters and attenuators and interlocks to keep exposures below the MPE limit for all conditions of operation and maintenance.
  • Class 4 lasers shall also be equipped with a removable master key switch if provided by the manufacturer. The laser shall not be operable when the key is removed.
  • The lasers should be equipped with electrical connections that allow for an access control system and remote shut-off devices.  When the terminals are open-circuited, the laser must not emit any radiation in excess of the MPE. Class 4 laser systems must be equipped with an integral and permanently attached beam stop or attenuator capable of preventing the emission of laser light in excess of the MPE limit when the beam is not required.

C.    Class 3B and 4 Laser Controlled Area

The following items are required for Class 3B laser controlled areas:

  • Posted with the appropriate warning sign(s).
  • Operated by qualified and authorized personnel.
  • Under the direct supervision of an individual knowledgeable in laser safety.
  • Have any potentially hazardous beam terminated in a beam stop of an appropriate material.
  • Have only diffuse reflective materials in or near the beam path, where feasible.
  • Have personnel within the controlled area provided with the appropriate eye protection if there is any possibility of viewing the direct or reflected beams.
  • Have the laser secured such that the beam path is above or below eye level of a person in any standing or seated position, except as required for medical use.
  • Have all windows, doorways, open portals, etc. from an indoor facility be either covered or restricted in such a manner as to reduce the transmitted laser radiation to levels at or below the appropriate ocular MPE.
  • Require storage or disabling (for example, removal of the key) of the laser or laser  system when not in use to prevent unauthorized use.

In addition to the items listed for Class 3B areas, the following are required for Class 4 lasers:

  • Personnel who enter a Class 4 controlled area during laser operation shall be adequately trained, provided with appropriate protective equipment, and follow all applicable administrative and procedural controls.
  • Class 4 area/entryway safety controls shall be designed to allow both rapid egress by laser personnel at all times and admittance to the laser controlled area under emergency conditions.
  • For emergency conditions there shall be a clearly marked “Panic Button” (remote controlled connector or equivalent device) available for deactivating the laser or reducing the output to the appropriate MPE levels.
  • Area or entryway safety controls to deactivate the laser or reduce the output to the appropriate MPE levels in the event of unexpected entry into the laser controlled area.
  • These controls may be non-defeatable, defeatable or procedural as determined by the LSO.
  • Temporary Laser Controlled Area

Where removal of panels or protective housings, over-riding of protective housing interlocks, or entry into the NHZ becomes necessary (such as for maintenance and service) a temporary laser controlled area shall be set up.  The temporary laser controlled area shall be posted on the outside with a Notice sign and with the appropriate warning sign (Class 3B or Class 4) inside the controlled area to warn of the potential hazard.

6. PERSONAL PROTECTIVE EQUIPMENT

In addition to engineering and administrative controls, personal protective equipment for skin and/or eyes is often necessary when working with Class 3B or Class 4 lasers.

A.  Eye Protection

Eye protection suitable to the laser must be provided and worn within the laser control area if there is a potential for exceeding the MPE limit if the beam is viewed. Protective eyewear may include goggles, face shields, spectacles or prescription eyewear using special filter materials or reflective coatings.

No single type of eyewear will provide protection against all wavelengths of laser radiation; therefore, eye protection should:

  • Provide enough visibility to move about safely.
  • Be able to withstand the maximum power of laser radiation likely to be encountered.
  • Be able to absorb the specific wavelength of radiation that is being used.
  • Be clearly labeled with wavelength they are designed for, the optical density at that wavelength, together with the maximum power rating.
  • Be inspected periodically by the laser operator to ensure that pitting, cracking and other damage will not endanger the wearer.

Lasers that can be tuned through a range of wavelengths present special problems. Broad band laser goggles may provide the level of protection required but they must be chosen with great care. Contact EH&S at 509-335-3041 for assistance with choosing the correct protective equipment.

B.   Skin Protection

Skin injuries from lasers primarily fall into two categories: thermal injury (burns) from acute exposure to high power laser beams and photochemically induced injury from chronic exposure to scattered ultraviolet laser radiation.

Thermal injuries can result from direct contact with the beam or specular reflections. These injuries (although painful) are usually not serious and are normally easy to prevent through proper beam management and hazard awareness.

Photochemical injury may occur over time from ultraviolet exposure to the direct beam, specular reflections, or even diffuse reflections. The effect can be minor or severe sunburn, and prolonged exposure may promote the formation of skin cancer. Proper protective eyewear and clothing may be necessary to control UV skin and eye exposure.

Clothing such as gloves and covers for the forearms may be required to protect the skin if laser intensity and wavelength warrant such protection. This is most important if the laser is running in the ultra-violet. Very large peak powers with pulsed ultra-violet laser can be particularly dangerous.

Other protective equipment includes window drapes designed to prevent the escape of the laser beam outside of the room that it is in. The type of drape used must be appropriate to the laser. Some laser beams such as that from a CO2 laser do not penetrate glass and therefore do not require the use of window drapes.

Contact EH&S at 509-335-3041 for further information on protective equipment.

NOTE:  All employees required to wear personal protective equipment must undergo a certified hazard assessment for PPE use and receive specific PPE training per Washington State Department of Labor and Industries regulations. This assessment and training is the responsibility of the individual PI/lab supervisor. Please contact EH&S at 509-335-3041 for further information.

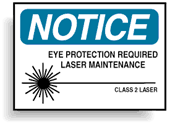
7. WARNING LABELS AND SIGNS

ANSI Z136.1 requires that lasers and laser systems have appropriate warning labels and that the areas in which they operate be posted with appropriate warning signs. For further information contact EH&S at 509-335-3041. The figures below are examples of laser warning signs:

8. LASER SAFETY STANDARD OPERATING PROCEDURES (SOP)

A written SOP is required for Class 3B and 4 lasers.
See Appendix Q for a template and example of a completed Laser SOP.

9. LASER SAFETY TRAINING

All Class 3B or Class 4 laser users are required to complete laser safety training. EH&S is available to assist with development of your laboratory specific training programs and offers templates, guides and canned presentations for adaption to your needs. See the Laboratory Safety web page or call 509-335-3041 for further information.

In addition, all laser operators must be trained on the usage of each specific laser to be used. The Principal Investigator, vendor, or other qualified individual may provide this training. Records of this training must be maintained.

Before operating a Class 3B, Class 4 laser, or an embedded Class 3B or Class 4 laser with the protective housing removed, a person must:

Review the Laser Safety Guide for that laboratory.

Receive from the Principal Investigator a thorough review of the laser equipment to be used and the administrative requirements, alignment procedures and applicable SOPs.

Review the operating and safety instructions furnished by the manufacturer.

Utilize appropriate personal protective equipment.

10. EXPOSURE INCIDENTS

If an exposure incident occurs, the affected individual(s) must inform their supervisor and an Online Incident Report Form must be completed and submitted online within 24 hours. Failure to do so may result in a denial of the claim. If the incident occurs outside of regular clinic hours, individual(s) should be seen at the Emergency Room. A Supervisor’s Accident Investigation Report may also be necessary.

11. ASSOCIATED HAZARDS

A. Electrical Hazards

The most lethal hazard associated with lasers is the high voltage electrical system required to power lasers. Several deaths have occurred when commonly accepted safety practices were not followed by persons working with high voltage sections of laser systems. Lockout Tagout (LOTO) training is required before performing any work on energized sources. For further information on LOTO training contact EH&S at 509-335-3041.

The following is a list of recommended electrical safety practices:

  • Only authorized and trained individuals may perform electrical tasks, check with your supervisor prior to conducting any work on electrical systems.
  • Do not wear rings, watches or other metallic apparel when working with electrical equipment.
  • When working with high voltages, regard all floors as conductive and grounded.
  • Do not handle electrical equipment when hands or feet are wet or when standing on a wet floor.
  • Be familiar with electrocution rescue procedures and emergency first aid.
  • Prior to working on electrical equipment, de-energize the power source. Only trained personnel are authorized to perform LOTO procedures. Lockout and tag-out the disconnect switch.
  • Check that each capacitor is discharged and grounded prior to working in the area of the capacitors.
  • Use shock preventing shields, power supply enclosures, and shielded leads in all experimental or temporary high-voltage circuits.

B.   Laser Generated Airborne Contaminants (LGAC)

Laser Generated Airborne Contaminants (LGAC) are air contaminants associated with the use of Class 3B and Class 4 lasers. LGACs result from the interaction of the laser beam with target or other materials and can include metallic fumes and dust, chemical fumes and aerosols containing biological contaminants. Some examples of LGAC that may be generated include benzene, anthracene and biphenyl.

Many dyes used as lasing media are toxic, carcinogenic, corrosive or pose a fire hazard. A chemical inventory and safety data sheet (SDS) must be available in the laboratory’s Chemical Hygiene Plan. Further assistance in developing a specific Chemical Hygiene Plan is available from EH&S.

Various gases might be exhausted by lasers or produced by targets. Proper ventilation is required to reduce exposure levels of the gas products below acceptable limits.

Cryogenic fluids are used in the cooling systems of certain lasers.  As these materials evaporate, they replace the oxygen in the air; thus, adequate ventilation must be ensured.  Cryogenic fluids are potentially explosive when ice collects in valves or connectors that are not specifically designed for use with cryogenic fluids.  Although the quantities of liquid nitrogen used are small, protective equipment may be required to prevent freeze burns.

In addition, compressed gases used in lasers may also present potential health and safety hazards. Problems may arise when working with unsecured cylinders, cylinders of hazardous materials not maintained in ventilated enclosures, and gases of different categories (toxins, corrosives, flammables and oxidizers) are stored together. Contact EH&S for further information at 509-335-3041.

C.   Collateral Radiation

Radiation other than that associated with the primary laser beam is called collateral radiation. Examples are X-rays, LTV, plasma, radio frequency emissions, and ionizing radiation. X-rays could be produced from two main sources in the laser laboratories: Electric-discharge lasers and high-voltage vacuum tubes of laser power supplies, such as rectifiers, thyratrons and crowbars. Any power supplies that require more than 15 kilovolts (kV) may produce enough X-rays to cause a health hazard. Interaction between X-rays and human tissue may cause a serious disease such as leukemia or other cancers, or permanent genetic effects that may show up in future generations.

D.   Fire Hazards

Class 4 lasers represent a fire hazard.  Depending on the construction material, beam enclosures, barriers, stops and wiring are all potentially flammable if exposed to high beam irradiance for more than a few seconds.

E.   Explosion Hazards

High-pressure arc lamps, filament lamps and capacitors may explode violently if they fail during operation. These components are to be enclosed in a housing that will withstand the maximum explosive force that may be produced.  Laser targets and some optical components also may shatter if heat cannot be dissipated quickly enough. Consequently care must be used to provide adequate mechanical shielding when exposing brittle materials to high intensity lasers. Liquid nitrogen may explode under certain conditions.

12. GLOSSARY

Aversion Response (Blink Response) – The closure of the eyelid or movement of the head to avoid exposure to a noxious stimulant of bright light. It generally occurs within 0.25 seconds, which includes the blink reflex time.

Continuous Wave (CW) – The output of a laser, operated in a continuous rather than a pulsed mode. For purposes of safety evaluation, a laser that is operated with a continuous output for a period of 0.25 seconds or greater is regarded as a CW laser.

Controlled Area – An area where the occupancy and activity of those within is subject to control and supervision for the purpose of protection from laser radiation and related hazards.

Diffuse Reflection – Change of spatial distribution of a beam of radiation when it is reflected in many directions by a surface or by a medium.

Energy – The capacity for doing work. Energy content is commonly used to characterize the output from pulsed lasers and is generally expressed in Joules (J).

Fail-Safe Interlock – An interlock where the failure of a single mechanical or electrical component of the interlock will cause the system to go into, or remain in, a safe mode.

Infrared Radiation – Electromagnetic radiation with wavelengths that lie within a range of 700 nm to 1 mm.

Intrabeam Viewing – The viewing condition whereby the eye is exposed to all or part of a laser beam.

Irradiance (E) – Radiant power incident per unit area upon a surface, expressed in watts per square centimeter (W/cm2).

Laser – Light Amplification by Stimulated Emission of Radiation. A device that produces an intense, coherent, directional beam of light by stimulated emission of electronic or molecular transitions to lower energy levels.

Laser Operator – An individual who has met all applicable laser safety training and approval requirements for operating a laser or laser system.

Maximum Permissible Exposure (MPE) – The level of laser radiation to which a person may be exposed without hazardous effect or adverse biological changes to eye or skin.  MPE is expressed in terms of either radiant exposure (Joules/cm2) or irradiance (Watts/cm2). The criteria for MPE are detailed in Section 8 of ANSI Z136.1.

Nominal Hazard Zone (NHZ) – The space within which the level of the direct, reflected, or scattered radiation during normal operation exceeds the applicable MPE.  Exposure levels beyond the boundary of the NHZ are below the appropriate MPE level.

Optical Density (Di) – Logarithm to the base ten of the reciprocal of the transmittance: Di = log T, where T is the transmittance.

Power – The rate at which energy is emitted, transformed, or received in Watts/second or Joule/second. Also called the radiant power.

Principal Investigator – The individual who is responsible for the laboratory space.

Pulsed Laser – A laser that delivers its energy in the form of a single pulse or a train of pulses. The duration of a pulse is regarded to be less than 0.25 seconds.

Q-Switched Laser – A laser that emits short (~30 nanoseconds), high-power pulses by means of a Q-switch.  A Q-switch produces very short, intense laser pulses by enhancing the storage and dumping of electronic energy in and out of the lasing medium, respectively.

Radiant Exposure (H) – Surface density of the radiant energy received (Joules/cm2).

Radiant Flux (F) – Power emitted, transferred, or received in the form of radiation, expressed in Watts (also called radiant power).

Repetitively Pulsed Laser – A laser with multiple pulses of radiant energy occurring in sequence with a frequency of 1 Hz.

Specular Reflection – A mirror-like reflection typically resulting from a shiny, flat surface.

Standard Operating Procedure (SOP) – A set of operating instructions. The procedure specifies measures which, if followed, will ensure safe and correct use or performance of a task or procedure (such as operating a laser or laser system, or use of a chemical).

Transmittance – The ratio of total transmitted radiant power to the total incident radiant power.

Ultraviolet Radiation (Light) – Electromagnetic radiation with wavelengths smaller than those of visible radiation; for the purpose of laser safety, 180 nm to 400 nm.

Visible Radiation (Light) – Electromagnetic radiation that can be detected by the human eye.  This term is commonly used to describe wavelengths that lie in the range of 400 nm to 700 nm.

Watt – The unit of power or radiant flux.  1 watt = 1 Joule per second.

Wavelength – The distance between two successive points on a periodic wave that have the same phase.

13. REFERENCES

Washington Administrative Code 296-62-09005: Non-Ionizing Radiation

21 CFR 1040.10 – Performance Standards for Light-Emitting Products – Laser Products, FDA.

American National Standards Institute, “American National Standard for Safe Use of Lasers,” ANSI Z136.1, 2014

Laser Institute of America (LIA) 

Laser Institute of America’s Free Optical Density (OD) Calculator

Rockwell Laser Industries (RLI)

AIHA – Laboratory Health and Safety Committee – Lasers

Occupational Safety & Health Administration
STD 01-05-001 [PUB 8-1.7] – Guidelines for Laser Safety and Hazard Assessment  (1991, August 5)

Center for Devices and Radiologic Health

FAA Order 7400.2J see Chapter 29 – Operation of visible lasers at night near airports

Template-Laser-Safety-Program

LASER SAFETY PROGRAM- For Each Class 3 and 4 Lasers

Part I. AUTHORIZED PERSONNEL AND PERTINENT INFORMATION:

Responsible for Laser Safety (Refer to Responsible Parties in Appendix P):

· Principal Investigator / Supervisor – Laser Safety Officer: _______________________________________

· Phone Number: ______________________ E-Mail: _______________________________________

· Department: _________________________ Department Chair or Director: _____________________

Area(s) Covered by this Program (i.e., Building, Room Numbers, Construction Site, etc.): _______________

_________________________________________________________________________________________

Part II. LASER INFORMATION: Used to determine Maximum Permissible Exposure Limit, Nominal Hazard Zone, and Optical Density, please provide information in the requested units (i.e. Joules, Watts, etc.). The specific information requested is usually found in the specification pages of the manuals supplied by the laser manufacturer.

Laser Class (Check one that applies): □Class 1 □Class 2 □Class 3R □Class 3B □Class 4

· Laser Type (List, i.e., Nitrogen, ND:Yag, Helium Neon, etc): _____________________________________

______________________________________________________________________________________

· Manufacturer: __________________________________ Model Number: _________________

· Wavelength (s) or Wavelength Ranges: ________________ (μm)

· Please briefly describe your laser application (i.e. Laser Welding, Scribing, Cutting, etc.): _____________

_____________________________________________________________________________________

_____________________________________________________________________________________

· Mode: Check One and Provide Information.

□ Continuous Wave: Maximum Average Power: _______ (Watts) Exposure Time: _________ (Seconds)

Exposure Distance: _____________ (Meters) NOTE: For diffuse viewing Optical Density calculations, the optical density analysis requires the magnitude of the distance from the scattering site to the observer. Unless otherwise specified, a quarter of a meter (0.25m) will be used as the “viewing distance”.

□ Single Pulse: Pulse Energy: ________ (Joules) Pulse Length: ____________ (Seconds)

□ Multiple Pulse: Pulse Energy: ________ (Joules) Average Power: ___________ (Watts)

Pulse Length: ________ (Seconds Pulse Rate: ______________ (Hertz)

· Beam Shape: Check One – □ Circular □ Elliptical □ Rectangular □ Square

· Beam Diameter at exit of Laser: _____________________ (mm) Beam Divergence: __________(mrad)

Part II. LASER INFORMATION: (Continued)

· Used to determine the Nominal Hazard Zone for lens: Check One and Provide Information.

□ Non-Applicable (N/A)

□ Applicable: Focal Length: ________ (mm) Beam Diameter at Lens: _________ (mm)

· Used to determine Nominal Hazard Zone for fiber optics: Check One and Provide Information.

□ Non-Applicable (N/A)

□ Single Fiber Optics Mode Minimum Beam Waist _________________ (μm)

□ Multiple Fiber Optics Mode Numerical Aperture: ___________________

· Engineering Controls: Check all that apply.

□ Non-Applicable □ Protective Housing □ Interlocks □ Beam Stops

□ Optical System Attenuators □ Enclosed Beam Paths □ Remote Controls □ Emission Delays


Part III: SIGN AND SEND TO EH&S:

Once the information has been provided in Parts I and II, sign, date, and send the information to:

EH&S, Mail Stop 1172.

____________________________________________________ _______________________

Signature Date

Part IV: EH&S CALCULATIONS – RETURN TO SENDER:

Once EH&S receives the information provided in Parts I, II, and III, the following will be determined for class 3B and 4 lasers only.

· Maximum Permissible Exposure (MPE): ____________________________________________________

· Nominal Hazard Zone (NHZ): _____________________________________________________________

· Optical Density (OD – Protective Eyewear): __________________________________________________

____________________________________________________ ____________________

EH&S Signature Date

Part V: STANDARD OPERATING PROCEDURE / HAZARD ASSESSMENT

With the information provided in Parts I, II, III, and IV, complete standard operating procedure / hazard assessment for all Class 3 and 4 Lasers (See SOP Example). If assistance is needed, contact EH&S at 335-3041. Place a copy in the Laser Safety Program section of your Laboratory Safety Manual.

1. Introduction –

Descriptions of Laser

(See label and Manufacturer’s Manual )

System Description: ____________________________________________________________________

Type and Wavelength: __________________________________________________________________

Class: _______________________________________________________________________________

Intended Application: ____________________________________________________________________

Location: ______________________________________________________________________________

2. Hazards –

List all hazards associated with the laser.

Eye and skin hazards from direct and diffuse exposures: ______________________________

___________________________________________________________________________

Electrical Hazards: ___________________________________________________________

Laser Generated Air Contaminants: ______________________________________________

___________________________________________________________________________

Other Recognized Hazards: ____________________________________________________

3. Control Measures –

List control measures for each hazard.

Include the following:

Eyewear requirement, include wavelength and Optical Density: ________________________________

___________________________________________________________________________________

Additional PPE: _____________________________________________________________________

Location of PPE:_____________________________________________________________________

Description of controlled area, nominal hazard zone and entry controls: _________________________

__________________________________________________________________________________

Reference to Laser Manufacturer’s Manual: _______________________________________________________

Alignment Procedures (or guidelines): ___________________________________________________

__________________________________________________________________________________

Maintenance Procedures: _____________________________________________________________

4. Training Requirements –

State specific requirements.

The specific training requirements for authorized personnel are: ______________________________ _________________________________________________________________________________

_________________________________________________________________________________

_________________________________________________________________________________

_________________________________________________________________________________

5. Emergency Procedures – List contact information and action to be taken.

In case of emergency:

Notify Laser PI / Supervisor ________________________________________ at ext. _____________

For Emergency Medical Response call ext. ____________________________

Action to be taken:

Report all incidents to ______________________________________ at ext. ___________

Additional Procedures: ________________________________________________________.

6. Approved Personnel – All individuals approved to operate / maintain the laser.

ONLY trained and authorized personnel are allowed to operate and maintain laser.

Authorized Operators: ___________________________________

___________________________________

___________________________________

___________________________________

Authorized Maintenance /Service Personnel ______________________________

______________________________

______________________________

______________________________

7. Certification of SOP / Hazard Assessment

Name of principal investigator/supervisor – Laser Safety Officer

__________________________________________________________ ___________________

Print: Name, Title (Date)

__________________________________________________________ ___________________

(Signature) (Date)

Part VI: ADDITIONAL INFORMATION

This section has been provided for the insertion of additional information pertinent to your Laser Safety Program. Insert additional information in the WSU Laser Safety Program / Template. For example, Part VI might include the following:

● Laser Manufacturer’s Manual ● ANSI Laser Standard

● Beam Alignment Procedures ● Personal Protective Equipment Information

● Maintenance Instructions ● Cleaning Manuals

Part VII: MEDICAL SURVEILLANCE

Has medical surveillance program for laser been implemented (Check Yes or No)? □ Yes □ No

If yes, provide details with participants name and date of examination

NAME DATE

EXAMPLE

STANDARD OPERATING PROCEDURE FOR LASER OPERATION

1. Introduction –

Descriptions of Laser

System Description: Model 1000 Nd:YAG laser marker system manufactured by the XYZ Company.

This is a Class 1 laser system with an embedded Class 4 Laser.

Type and Wavelength: 1.064 micro meters

Class: Class 1 with Embedded Class 4.

Intended Application: Research

Location: Webster Hall, Room XYZ

2. Hazards –

List all hazards associated with the laser

Eye and skin hazards from direct and diffuse exposures: Eye Hazard from direct, reflected or scattered beam. Skin hazard

· Electrical Hazards: Inside power supply.

· Laser Generated Air Contaminants: Target material.

· Other Recognized Hazards: Fire hazard.

3. Control Measures –

List control measures for each hazard.

Include the following:

Eyewear requirement, include wavelength and Optical Density: Approved laser safety eyewear with OD=5.0+ @1064 nm is required for all personnel inside the controlled area.

Additional PPE: Lab coat, long pants, and closed-toed shoes.

Location of PPE: OD=5.0+ Glasses are stored in cabinet to left of door prior to entry zone.

Description of controlled area, nominal hazard zone and entry controls: Established controlled area using laser barrier and warning signs, Nominal Hazard Zone is 100 meters = entire lab.

Reference to Equipment Manual: See Model 1000 Nd:YAG Laser Manual and ANSI Standard Z136.1

Alignment Procedures (or guidelines): (See C.2.Part IV, Additional Information – Manual for beam alignment procedures. The following rules must be observed during the laser alignment: Only two trained personnel are allowed in the area during alignment procedures. All other activities are prohibited in the same room, unless appropriate protection is provided. Only essential personnel with the appropriate personal protective equipment are allowed in the work area. Place Warning Signs at entrances informing visitors of the dangers. Use low power visible lasers to simulate the path of the high power laser. When performing alignment procedures, reduce all high power laser beams to the minimum possible power. Avoid beam paths that are at sitting or standing eye level. Take off all reflective objects (e.g., rings, badges, watches) before performing any work involving the lasers. Terminate laser beams and specular reflection on diffuse reflecting beam blocks. Keep all combustibles, tools, and reflective surfaces away from the beam path. Make sure you know where the beam is and stay clear.

Maintenance Procedures: To be performed only by authorized maintenance personnel with the appropriate personal protective equipment (See Unit’s Laser Safety Program, Part I for a list of Authorized Personnel). Follow Manufacturer’s instructions (See Unit’s Laser Safety Program, Part VII Additional Information – Manufacturer’s Manual).

Power Supply: Work involving access to the power supply is normally done with the system locked and tagged out. Access to the energized power supply must be done only by qualified personnel using the buddy system. Workers are directed to review the electrical safety and power supply sections of the manual before any activities involving access to high voltage.

Exhaust System: When functioning normally, the exhaust system will remove all Laser Generated Air Contaminants even with the protective housing open. Notify Dr. Doe at 555-5555 if you think there might be a problem or contact EH&S at 335-3041.

4. Training Requirements –

State specific requirements.

The specific training requirements for authorized personnel are: Laser safety training is required before personnel will be authorized to be in the controlled area while the beam is accessible.

5. Emergency Procedures – List contact information and action to be taken.

In case of emergency:

Notify Laser PI / Supervisor Dr. Doe at ext. 555

For Emergency Medical Response call ext. 911

Action to be taken:

Report all incidents to Dr. Doe at ext. 555

Additional Procedures: If accident or injury, complete incident report and submit to Benefit Services

6. Approved Personnel –

All individuals approved to operate / maintain the laser.

List all authorized operators: Dr. Doe, Principal Investigator, Laser Safety Officer

Jane Doe, Laser Assistant

Ms. ANSI, Research Tech

List all authorized service personnel: John Doe, Laser Tech

7. Certification of SOP / Hazard Assessment

Name of principal investigator/supervisor – Laser Safety Officer

John Doe Principal Investigator – Laser Safety Officer 4 March 2005

Print: Name, Title (Date)

__________________________________________________________ ___________________

(Signature) (Date)

Factsheets-FAQSlipsTripsFalls

Avoiding Slips, Trips, & Falls

FAQSlipTrip

Slips, Trips, and Falls

They can result from sitting in a chair improperly, walking without adequate lights, or falling over a box or off a ladder. Hazards that can lead to slips, trips, and falls are often overlooked even though they cause many injuries, ranging from minor cuts and sprains to disabling injuries.
Although slip, trip, and fall hazards are easily created, they are also easy to correct. Be a “hazard look-out” to recognize and correct hazards quickly, before the next person becomes a victim.

Slip Hazards

A slip occurs when there is too little friction or traction between the footwear and the walking surface. Some common causes of slips are:

  • slippery floor surfaces
  • liquid, moisture, or ice on the floor
  • food, trash, or small objects on the floor
  • oil or grease on the floor
  • footwear that does not have nonskid soles.

Trip Hazards

A trip occurs when a person’s foot contacts an object or drops to a lower level unexpectedly and the person is thrown off balance. Some of the more common causes of tripping are:

  • furniture that creates obstacles
  • materials stored in passageways, aisles, and stairways
  • electrical or telephone cords that cross passageways and aisles
  • hazardous floor conditions such as protruding nails, holes, or loose boards
  • loose, ripped, or bunched carpets and rugs
  • desk or file cabinet drawers left open when they are no longer being used
  • objects protruding into passageways and aisles
  • floor level changes or hidden steps that may not be obvious
  • unsafe stairway conditions or use
  • elevator cars that do not level off at the same height of the floor where the elevator stopped
  • insufficient lighting for walking or working areas.

Fall Hazards

In addition to falls as a result of slips and trips, you may be injured if you fall from an elevation. Some causes of falls are:

  • using “makeshift” items (boxes, buckets, chairs, etc.) to gain more height
  • not sitting on “4- square” of their chairs
  • carrying large or too many items that prevents seeing where you are going
  • jumping from one level to another.

Preventing Injuries

Good housekeeping is one of the most important methods for preventing falls due to slips and trips. It includes:

  • cleaning up all spills immediately,
  • marking spills and wet areas,
  • mopping or sweeping debris from floors,
  • removing obstacles from walkways and always keeping them free of clutter,
  • securing (tacking, taping, etc.) mats, rugs and carpets that do not lay flat,
  • always closing file cabinet or storage drawers,
  • covering cables that cross walkways,
  • keeping working areas and walkways well lit,
  • replacing burned out light bulbs and faulty switches.

Without good housekeeping practices, any other preventive measures such as installation of sophisticated flooring, specialty footwear or training on techniques of walking and safe falling will never be fully effective.

Walking on Slippery Surfaces

  1. Take small steps-shorter than your foot length-to keep your center of balance under you.
  2. Walk with your toes pointed outward-which provides a wider, more stable base of support for maintaining balance.
  3. Turn gradually-a sharp turn results in a sideways force that can cause loss of balance and a fall.
  4. Keep both hands free for balance, rather than in your pockets.
  5. Wear shoes with slip-resistant soles, or studded shoe pullovers for walking on icy surfaces.
  6. Use sidewalks/walkways that have been cleared of ice and snow.

Using the Stairs

  1. Use the handrail from start to finish.
  2. Avoid carrying loads on stairways-or only carry loads that you can see over.
  3. Keep your eyes on where you’re going and descend stairs slowly to keep your balance and identify tripping hazards.
  4. Test potentially slippery stairs by tapping them with your foot.
  5. Going up or down, keep weight on your back leg until your front foot is safely on the next step. This maintains your center of gravity.

Most slips and trips can be prevented if you know what to look for and take action to reduce the risk and eliminate the hazards before someone is injured. If you don’t, the result can be potentially serious workers’ compensation injuries and costly lawsuits.

Getting Assistance

For more information about preventing slips, trips, and falls, contact Environmental Health & Safety at 335-3041.

Factsheets-FAQPeroxidizableChems

Peroxidizable Chemicals:

Safe Use and Handling

FAQPeroxChem
Peroxide formation in solvents and reagents have been the cause of occasional accidents. Even the relatively innocuous solvent, isopropyl alcohol is capable of peroxide formation. Explosive peroxides form by the reaction of a peroxidizable material with molecular oxygen through a process called autoxidation or peroxidation. This can occur upon exposure to air, heat, light, or simply with passage of time. Elevated concentrations of peroxides may become sensitive to heat, friction, or shock and become explosive.

Peroxide Formation

Peroxidation is generally a problem of the liquid state. Solid peroxide formers present little problem except when finely divided because the reaction, if any, occurs only at the surface. Peroxidation does not seem to be a problem in gases or vapors. For liquids, peroxidation usually occurs when containers are not fully sealed and blanketed with inert gas.

Generally, the more volatile a compound, the greater its potential hazard, because evaporation can significantly increase peroxide concentration. Special provisions should be taken to help prevent formation of elevated concentrations of peroxides.

Purchasing

Peroxide-forming materials should be purchased in amounts that will be used within six months to one year. This practice will help ensure that existing materials are consumed first, before dangerous levels of peroxide form.

In some cases, manufacturers add stabilizers or inhibitors that slow peroxide formation within the solvent’s shelf. Buy factory-inhibited materials if possible. Remember anesthetic ether and distilled peroxide-forming solvents contain no inhibitors.

Testing for Peroxide Formation

For safety reasons, WSU no longer recommends testing for peroxide concentrations in organic solvents. Testing may be more dangerous than helpful because the principal moment of danger occurs when the cap is twisted to open the container, whether for use or testing. Also, peroxide concentrations only become dangerous at levels that far exceed the 100 PPM detection limit of available test strips.

Furthermore, commonly used peroxide test strip kits, such as those supplied by EMQUANT, cost some $50 and are only viable for 90 days. Consequently, purchases of large quantities and test strips to extend utilization periods should be avoided, as they lead to a false sense of economy.

Therefore, use of peroxide test strips and labels should be discontinued and existing stocks of them discarded.

Container Storage

Store peroxide-forming materials in the original manufacturer’s container when possible. If it is necessary to use a different container, use one that is opaque and does not have a glass stopper or metal lid. These materials should be stored in tightly closed containers to eliminate evaporation and decrease contact with air.

Store material in a safe environment away from heat, light, and ignition sources. Containers should be protected from physical damage.

Upon receiving materials, write the date of receipt on the container if a manufacturer’s expiration date is not listed.

Handling

Procedures and precautions outlined in Standard Operating Procedures (SOPs) and Material Safety Data Sheets (MSDSs) should be followed.

If a viscous liquid or crystalline solid is observed in the material or around the cap, do not open or attempt to move the container. If already open, do not reseal. Immediately call EH&S for assistance.

Do not allow containers to evaporate to dryness. Rinse empty containers with water and dispose of in the trash.

Peroxide-forming materials should not be opened after the manufacturer’s expiration date or one year after receipt, whichever occurs first. These materials should be disposed of as dangerous waste.

Distillation

Commercially available peroxide-forming chemicals normally contain inhibitors to hinder formation of peroxides. Distillation of these solvents removes the inhibitors. If you choose to distill peroxide-forming solvents, please familiarize yourself with the associated hazards prior to distillation.

Common Peroxidizable Materials

Acetal Cyclohexane Decahydronaphthalene (Decalin) Diacetylene Dicyclopentadiene Diethyl ether Diethylene glycol dimethyl ether Dioxane Divinyl acetylene Ethylene glycol dimethyl ether Isopropyl ether Methyl acetylene Potassium metal Sodium amide Tetrahydrofuran Tetrahydronaphthalene (Tetralin) Vinyl ethers Vinylidene chloride

Getting Assistance

For additional information about peroxidizable chemicals or assistance with obtaining MSDSs or chemical disposal, see the procedures available via the internet or you may contact the EH&S office.

Factsheets-FAQLabVacuumPumps

Laboratory Vacuum Pumps: Care and Use

FAQVacPump

Mechanical vacuum pumps used in laboratories pose common hazards. These are the mechanical hazards associated with any moving parts and the chemical hazards of contaminating the pump oil with volatile substances and subsequently releasing them into the lab. A few guidelines will help in the safe use of these devices.

Vacuum System

Vacuum systems pose severe implosion hazards. Follow these guidelines and requirements to ensure system safety:

  • Ensure that pumps have belt guards in place during operation.
  • Ensure that service cords and switches are free from defects.
  • Do not place pumps in an enclosed, unventilated cabinet.
  • Do not operate pumps near containers of flammable chemicals.
  • Do not use solvents which might damage the pump.
  • Always close the valve between the vacuum vessel and the pump before shutting off the pump to avoid sucking vacuum oil into the system.
  • Place a pan under pumps to catch oil drips
  • Check oil levels and change oil when necessary. Replace and properly dispose of vacuum pump oil that is contaminated with condensate. Used pump oil must be disposed as hazardous waste.
  • Conduct all vacuum operations behind a table shield or in a fume hood and always wear safety glasses.
  • Always use a trap on vacuum lines to prevent liquids from being drawn into the pump, house vacuum line, or water drain.

Traps

When using a vacuum source, it is important to place a trap between the experimental apparatus and the vacuum source. The vacuum trap:

  • protects the pump and the piping from the potentially damaging effects of the material,
  • protects people who must work on the vacuum lines or system, and
  • prevents vapors and related odors from being emitted back into the laboratory or system exhaust.

When using a vacuum-filtration assembly, pay strict attention to the liquid levels in the trap bottle. Use a secondary trap bottle so that if liquid in the primary trap bottle reaches the inlet tubes, the liquid will be vacuumed into the secondary container instead of the pump. This will help reduce vapors in the atmosphere and expensive vacuum pump replacement costs.
If you are directly vacuuming large quantities of gases over a long period of time, contact Environmental Health & Safety for assistance in identifying appropriate filters for minimizing vapor release.
If a vacuum pump is required for lower pressures, the pump must be fitted with a cold trap to condense the volatiles. A cold trap is a condensing device to prevent moisture contamination in a vacuum line. When using a cold trap:

  • Locate the cold trap between the system and vacuum pump.
  • Ensure that the cold trap is of sufficient size and cold enough to condense vapors present in the system.
  • Check frequently for blockages in the cold trap.
  • Use isopropanol/dry ice or ethanol/dry ice instead of acetone/dry ice to create a cold trap. Isopropanol and ethanol are less expensive, less toxic, and less prone to foam.
  • Use gloves when handling the dry ice.
  • Do not use dry ice or liquefied gas refrigerant bath as a closed system. These can create uncontrolled and dangerously high pressures.
  • Liquid nitrogen should only be used with sealed or evacuated equipment, and then only with extreme caution. If the system is opened while the cooling bath is still in contact with the trap, oxygen may condense from the atmosphere and react vigorously with any organic material present.
  • Maintain a cold trap between a vacuum pump and the apparatus – do not use liquid nitrogen as trap coolant when pumping organic compounds (liquid oxygen may condense in the trap, leading to explosive oxidation).
  • A disinfectant trap should be used in-line when a vacuum is used with hazardous biological materials.

Container Selection

  • Do not apply a vacuum to a flat-bottomed flask. Use only containers that can withstand vacuum operations – heavy-walled round-bottomed glassware or specifically-designed glassware (e.g., Erlenmeyer filtration flasks).
  • Wrap exposed glass with tape to prevent flying glass if an implosion occurs.
  • Carefully inspect vacuum glassware before and after each use. Dispose of any glass that is chipped, scratched, broken, or otherwise stressed. 

Desiccators

It is important to use properly designed equipment for experiments carried out under reduced or elevated pressure.

  • Vacuum desiccators should be enclosed in approved shielding device or protected with a framework of wire, nylon or other suitable material.
  • Glass desiccators often have a slight vacuum due to contents cooling. When possible, use molded plastic desiccators with high tensile strength. For glass desiccators, use a perforated metal desiccator guard.
  • Air admittance should be carried out gradually. When opening, make sure atmospheric pressure has been restored.
  • Never carry an evacuated desiccator. 

Getting Assistance

If you have questions regarding the safe use of vacuum pumps, contact your supervisor or EH&S.

Factsheets-FAQElectrophoresis

Electrophoresis Power Supply Safety

FAQElecphoresis

Many laboratories routinely use electrophoresis equipment without incident. However, the power supply runs at a voltage and amperage sufficient to deliver a potentially fatal electric shock. Therefore, it is essential to use electrophoresis power supplies safely.

Electrical Hazards

The electric shock from an electrophoresis power supply can cause burns and damage to skin, muscles and nerves. In general, the greater the amperage, the greater the hazard. Amperages greater than 50 milliamps (mA) can be fatal. Typical electrophoresis power supplies produce direct current (DC) up to 3,000 volts and 500 mA.

Voltage and Amperage

Most electrophoresis power supplies carry clearly visible labels warning “Danger, High Voltage”. Granted, although a shock of a few thousand volts is uncomfortable, it’s not going to harm most people. The current, or amperage, is what poses the danger. While the volts cause the shock, the amps cause the physical damage to the body. The high current or amperage found in most electrophoresis power supplies is sufficient to cause harm. The common saying among electricians is “current kills”. Even a relatively low voltage shock can be fatal, if the amperage is high enough. So why worry about voltage? To understand that, we need to review Ohm’s law which correlates current (I), voltage (E) and resistance (R):
I = E / R
Current (I) is directly proportional to the voltage (E) (i.e., the power supply) and inversely proportional to the resistance (R) of the circuit (i.e., whatever the power passes though).

If your wet hands touch exposed live power leads, your body would have a resistance between 1000 to 10,000 W. At 120 V (DC), the current passing through you would be between 12 and 120 mA. As the table below shows, a 12 mA current delivers a shock, however a 120 mA current is sufficient to cause respiratory paralysis. Given that most power supplies deliver up 3,000 V (DC), the risk of physical harm is very real.

Physical Effects of Electric Shock

An electrical shock can overstimulate nerves causing wide ranging physiological effects.

  • Your heart may stop or flutter. Your arteries also may contract, making it harder for your heart to pump blood.
  • Electricity through the muscles causes them to contract, or spasm. This might make it so you can’t let go of the energized equipment. Contractions of the chest muscles may make it difficult to breathe.
  • Electricity can damage nerves, causing unconsciousness, paralysis, brain damage, and other problems.
  • Electricity can burn skin where it enters and exits. These burns may be sufficient to kill a person or destroy an arm or a leg.

Equipment Inspections

Inspect electrophoresis equipment and ensure it is functioning properly by checking components before each use.

  • Inspect power cords and leads for frayed, cracked or dried out cords; exposed copper wire at the banana jacks (caused by pulling on the wire instead of the jack when trying to remove the jack); and corroded or loose fitting banana plugs, banana jacks, or electrode connection nut, which may cause electrical arcing between the plugs, resulting in fire or irreproducible results.
  • Discard and replace all cords that do not pass the inspection. Some manufacturers recommend replacing banana jacks annually.
  • Inspect gaskets on vertical electrophoresis chambers to ensure they are not leaking. If leaks are found, contact the manufacturer for replacement gaskets.
  • Inspect the electrophoresis chamber for buffer leaks, caused by crazing or cracks in the plastic. Loss of buffer can lead to electrical arcing and fires.
  • Inspect the safety guards to ensure proper function, including no load sensors, open load sensors, and ground leakage detectors on the power supply and safety interlocks on the cover.

Preventing Injuries

  • Read and follow the manufacturer’s instructions.
  • Develop and implement written Standard Operating Procedures (SOPs) and train employees and students.
  • Do not alter or modify the equipment without written approval from the manufacturer.
  • Repairs and maintenance should only be done by a qualified technician.
  • Do not defeat or remove safety interlocks.
  • Keep the area free of organics, solvents, and combustibles.
  • Only use electrophoresis chambers with covers, preferably ones that are interlocked with the power supply.
  • Be sure that banana plugs are fully seated. Arcing may occur if the plugs are not completely inserted.
  • Make sure power supplies and apparatus are properly matched. Some chambers may be damaged by high voltages.
  • Always shut off the power prior to disconnecting leads, accessing the chamber, or adjusting the settings.
  • Handle power leads one lead at a time with only one hand to reduce the likelihood of electrical shock.
  • You are strongly encouraged to only use newer power supplies with no load sensors and chambers that are equipped with safety interlocks.

Getting Assistance

Questions relating to safe operation of electrophoresis power supplies and chambers should be directed to the manufacturer.

EH&S can provide additional training regarding a wide range of laboratory practices, including the safe operation of electrophoresis units.

manual-s3bWashLocation

Emergency Washing Facilities

– Determining Need & Location (training / factsheets)

Emergency washing facilities

(EWF), such as eyewash, showers, or both, are needed where employees may be exposed to corrosive, strong irritant, toxic, or skin-absorptive chemicals that could injure the eyes or body. These facilities are designed to provide copious amounts of water to wash contaminants from the eyes and body.

Determining Need

Assess the workplaces to identify chemicals that could injure the eyes or get onto the body during the course of work. Observe work practices, interview workers and review sources of information, such as material safety data sheets (MSDS), written standard operating procedures (SOPs), or similar documents that may help determine if personal protective equipment (PPE) and emergency washing facility are required.

Conduct assessments whenever new equipment, processes or chemicals are introduced or an injury or illness indicates the need.

Personal Protective Equipment

The availability of an EWF does not replace the need for PPE. Select PPE based on the types of hazards identified during the assessments, level of protection needed, fit and comfort.

Contact lenses do not provide protection from chemical splashes, but can be worn safely in combination with appropriate personal protective eyewear. For additional information, see EH&S fact sheet “Eye and Face Protection – The Eyes Have It” and SPPM S3.10, “General Requirements for Personal Protective Equipment.”

EWF Types

Emergency washing facilities are either plumbed, self-contained, or personal units. Plumbed units are preferred where a clean water source is readily available. Self-contained units are effective where a water source is not readily available. Personal units are supplementary.

There are several types of units available. Plumbed unitsinclude:

  • eyewashes (a device to irrigate and flush the eyes),
  • eye/face washes (a device to irrigate and flush both the face and the eyes),
  • safety showers (an assembly of a shower head controlled by a stay-open valve and operated by an approved control valve actuator),
  • hand-held drench hoses (a single-headed emergency washing device connected to flexible hoses used to irrigate and flush the face or other parts of the body). If your workplace is equipped with a drench hose and no eyewash, the drench hose can be used in case of emergency; however, an ANSI approved eyewash should be installed as soon as possible. Until installation, provisions should be made to always have two or more persons in the workplace when using chemicals that could damage the eyes. One person can then assist the injured by holding and directing the drench hose while the injured party is free to hold open the eyelids. Drench hoses provide support for emergency shower and eyewash units, but they do not replace them, and cannot be used as a sole means of protection. However, a drench hose is useful when the spill is small and does not require an emergency shower and can be used with a shower for local rinsing, particularly on the lower extremities.
  • combination units (a combination of eyewash/shower or drench hose designed so all components operate individually).

Several self-contained units are also available:

  • Eyewash/safety showers in which the device contains its own flushing fluid and must be refilled or replaced after use. Self-contained systems must never hold expired fluids.
  • personal eyewash units with solution/ squeeze bottles (supplementary eyewash that supports plumbed units, s e lf – cont ained units, or both by delivering immediate flushing fluid for less than 15 minutes ) . They provide support for plumbed or self-contained eyewash units, but they do not replace them. They cannot be used as a sole means of protection. However, they are useful because they allow for quick flushing of the eyes when plumbed or self-contained units are not immediately available. Upon flushing, personnel should seek a plumbed or self-contained unit and thoroughly flush the eyes according to the MSDS or available information.

If an EWF is used to flush the eyes, prompt medical attention is important, regardless of the severity of the injury.
Getting Assistance
If an EWF is available, but you are not familiar with the specifications, responsibilities, and training, see separate fact sheet “Emergency Washing Facilities-Specifications, Responsibilities, and Training“, the Laboratory Safety Manual, or SPPM S5.15 “Eyewashes and Safety Showers”.

Getting Assistance

If an EWF is required but one is not available, contact your supervisor, departmental safety committee, or Environmental Health and Safety (EH&S). EH&S provides EWF assessments and will work with supervisors and safety committees to ensure installation of an ANSI approved EWF.

For additional information, contact EH&S at 5-3041.

Factsheets-FAQEWFLocation

Emergency Washing Facilities:

Determining Need & Location

FAQEWFLocation

Emergency Washing Facilities

(EWF), such as eyewash, showers, or both, are needed where employees may be exposed to corrosive, strong irritant, toxic, or skin-absorptive chemicals that could injure the eyes or body. These facilities are designed to provide copious amounts of water to wash contaminants from the eyes and body.

Determining Need

Assess the workplaces to identify chemicals that could injure the eyes or get onto the body during the course of work. Observe work practices, interview workers and review sources of information, such as safety data sheets (SDS), written standard operating procedures (SOPs), or similar documents that may help determine if personal protective equipment (PPE) and emergency washing facility are required.
Conduct assessments whenever new equipment, processes or chemicals are introduced or an injury or illness indicates the need.

Personal Protective Equipment

The availability of an EWF does not replace the need for PPE. Select PPE based on the types of hazards identified during the assessments, level of protection needed, fit and comfort.
Contact lenses do not provide protection from chemical splashes, but can be worn safely in combination with appropriate personal protective eyewear. For additional information, see EH&S fact sheet “Eye and Face Protection – The Eyes Have It” and Safety Policies and Procedures Manual, General Requirements for Personal Protective Equipment.

EWF Types

Emergency washing facilities are either plumbed, self-contained, or personal units. Plumbed units are preferred where a clean water source is readily available. Self-contained units are effective where a water source is not readily available. Personal units are supplementary.
There are several types of units available. Plumbed units include:

  • eyewashes (a device to irrigate and flush the eyes),
  • eye/face washes (a device to irrigate and flush both the face and the eyes),
  • safety showers (an assembly of a shower head controlled by a stay-open valve and operated by an approved control valve actuator),
  • hand-held drench hoses (a single-headed emergency washing device connected to flexible hoses used to irrigate and flush the face or other parts of the body). If your workplace is equipped with a drench hose and no eyewash, the drench hose can be used in case of emergency; however, an ANSI approved eyewash should be installed as soon as possible. Until installation, provisions should be made to always have two or more persons in the workplace when using chemicals that could damage the eyes. One person can then assist the injured by holding and directing the drench hose while the injured party is free to hold open the eyelids. Drench hoses provide support for emergency shower and eyewash units, but they do not replace them, and cannot be used as a sole means of protection. However, a drench hose is useful when the spill is small and does not require an emergency shower and can be used with a shower for local rinsing, particularly on the lower extremities.
  • combination units (a combination of eyewash/shower or drench hose designed so all components operate individually).

Several self-contained units are also available:

  • eyewash/safety showers in which the device contains its own flushing fluid and must be refilled or replaced after use. Self-contained systems must never hold expired fluids.
  • personal eyewash units with solution/ squeeze bottles (supplementary eyewash that supports plumbed units, s e lf – cont ained units, or both by delivering immediate flushing fluid for less than 15 minutes ) . They provide support for plumbed or self-contained eyewash units, but they do not replace them. They cannot be used as a sole means of protection. However, they are useful because they allow for quick flushing of the eyes when plumbed or self-contained units are not immediately available. Upon flushing, personnel should seek a plumbed or self-contained unit and thoroughly flush the eyes according to the SDS or available information.

If an EWF is used to flush the eyes, prompt medical attention is important, regardless of the severity of the injury.

Getting Assistance

If an EWF is available, but you are not familiar with the specifications, responsibilities, and training, see separate fact sheet “Emergency Washing Facilities-Specifications, Responsibilities, and Training“, the Laboratory Safety Manual, or Safety Policies and Procedures Manual, Eyewashes and Safety Showers.
If an EWF is required but one is not available, contact your supervisor, departmental safety committee, or Environmental Health and Safety (EH&S). EH&S provides EWF assessments and will work with supervisors and safety committees to ensure installation of an ANSI approved EWF.
For additional information, contact EH&S at 5-3041.

es-OHRTTraining

Spill Prevention, Control, and Countermeasure Plan (SPCC Plan)

Oil Handler Annual Refresher Training

Washington State University has numerous sites on campus which store oil for internal use. Unknown to most people, the Environmental Protection Agency established regulations within the Clean Water Act specifically addressing oil storage. The regulations primarily focus on protecting the nation’s waters from pollution in order to maintain the biological, chemical, and physical integrity of those waters. While this includes preventing point and non-point pollution sources it also embraces the importance of improving communities’ wastewater treatment and disposal.

Many understand the importance of clean water, but most are unaware of the actual effects a small amount of oil could have on a water source. One pint of oil can potentially cover nearly an acre of water surface. This oil sheen prevents sunlight from reaching aquatic plant life inhibiting the plants’ ability to perform photosynthesis. It also impedes oxygen from reaching the aquatic life that so desperately need it for survival. The type of oil is not limited to petroleum based products. It also includes vegetable oils and animal fats. Once it is understood how important and extensive the task of managing all types of oil is, the process of creating guidelines to prevent these agents from contaminating the water sources of the surrounding environment can begin.

This is accomplished is by developing standard operating procedures (SOPs) for every task where oil is used or handled.  The SOPs are created using best management practices. SOPs are developed through a cooperative effort between WSU EH&S and WSU departments. It is asked that if you or your department work with oil on a regular basis you should familiarize yourself with your SOPs, and attend an initial Spill Prevention Control and Countermeasure (SPCC) training course or complete this online refresher course.  If you find any discrepancy with the SOPs and how work is completed please contact EH&S to ensure that these procedures are updated.

EH&S continues to look for ways to minimize potential environmental contamination.  Over the last two years several areas of concern were observed.  For example, in 2013, Dining Services and the Compton Union Building (CUB) installed stainless steel tanks with caddy systems to improve the safe transport and storage of used cooking oil.  At the Northside Dining Hall, a drum located on the north loading dock was overfilled and left unattended allowing the oil to seep out.

Releases such as this are easily prevented.  While this spill was small, any amount of water from precipitation could have allowed the oil to reach the stormwater drain, potentially contaminating surface water.  Proper initial and refresher training remind workers to remain cognizant of the amount of oil they are pouring into the containers, to watch for overflows, and to immediately call EH&S if one should appear.

Likewise, a challenging area this year concerned transformers in the Information Technology Building.  These transformers had bad bushings that were allowing oil to be released into the containment.  The leaks were noted during inspections and repaired.  Had regular inspections and maintenance not been completed on these transformers, the problem could have been more extensive.  This example shows the importance of secondary containment which can prevent soil or groundwater contamination.

Another problematic behavior pattern seen throughout campus are residents who change the oil in their vehicles. Unfortunately, many people are unsure of how to properly dispose of this oil so they simply decide to dump it down storm drains or throw it into dumpsters. This is due to inadequate communication and lack of education provided to residents. These discharges are illegal and can pose many threats to the water and surrounding environment. Should you see any illegal discharges please notify EH&S immediately and we will work with those persons involved to contain and manage the spill.

As a reminder, below is the summary of WSU’s discharge protocol.  This protocol is an attempt to maintain an effective SPCC Plan that prevents accidental releases from contaminating surface water.  The discharge protocol is included in all SOPs.

If safe to do so the employee should:

  • Stop the discharge
  • Protect storm and sanitary drains. WSU’s storm water drains eventually reach surface water.
  • If a spill is beyond your cleanup capabilities, call 911 or notify Facilities Operations dispatch at 335-9000 to activate the Contingency Plan
  • Provide all vital information to dispatcher

Facilities Operations Heavy Equipment, Motor Pool, and Grounds have spill response kits on vehicles with larger tanks and on site during projects.  These kits contain absorbent material, bags, bucket, and disposable gloves.  However, they can only respond to spills within their own department unless requested to assist by EH&S.

Once responders arrive on scene their responsibilities are:

  • Stop discharge, if not already done
  • Contain release material
  • Cleanup spilled material
  • Make all appropriate notifications
  • Dispose of cleanup materials properly
  • Release back to the operator

Thank you for all your help and safe work practices over the last year.  If you have any questions, please, see our Contact Page.

Please click on this link and certify you have completed this refresher training.